Collaborative Autopsy: How It Works
 At OSDFCon this year, we launched a new version of Autopsy with a number of collaboration features. The fundamental interface and end use of Autopsy hasn’t changed with the new v4.0, but there are a few differences between configuring a single-user vs. a collaborative environment. This post describes them in greater detail.
Why a Collaborative Autopsy Deployment?
Investigators of large, complex cases have found over recent years that the number of devices they must forensically process is increasing, along with storage space on those devices. To maximize the amount of evidence they can retrieve, case managers often break a large case into sets of images and assign multiple people to collect and analyze these data sets. Each examiner works on one set of images with a single-user tool, and the team then merges the results once they’ve completed all analysis.
However, this isn’t ideal. Each image can be processed relatively quickly in isolation, but it is harder to merge the results together to get the big picture. Tagged or bookmarked results are scattered across each person’s case files, so that not only is the process of merging results not easy, it might even need to be done more than once.
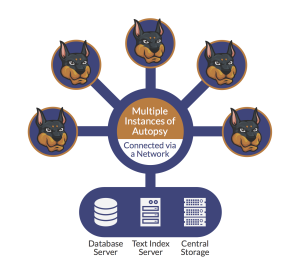
The answer: a collaborative environment. In a collaborative system, everyone can see all of the results in near real time. Results no longer need to be merged, and a single, unified report can be generated at any time. While collaborative systems exist, however, they cost a lot of money, pricing many law enforcement and smaller corporate teams out of the market.
As we announced at the beginning of November, we’ve added a number of collaboration features in Autopsy 4.0 — along with all other Autopsy core features, completely free of charge. The result of custom work for one of Basis Technology’s clients, Autopsy’s collaborative features rely on the same interface, only configured to use centralized data and services.
What’s Needed
To create a collaborative Autopsy deployment, you’ll need to install some central services and then configure each Autopsy client to use those services. Your lab will need the following:
- Central storage that all computers can access that will store the drive images and case folders. This can be a basic computer with Windows file sharing or a fancy Storage Area Network (SAN).
- A central database server running PostrgreSQL.
- A central Apache Solr server for keyword search
- A central messaging server to so that Autopsy can get real-time updates.
You’ll probably want to have two dedicated computers to run these programs on. The Autopsy User’s Guide has detailed instructions for setting up each of the services. The rest of this document shows how to configure those services in an Autopsy client.
Configuring Multi-User Autopsy
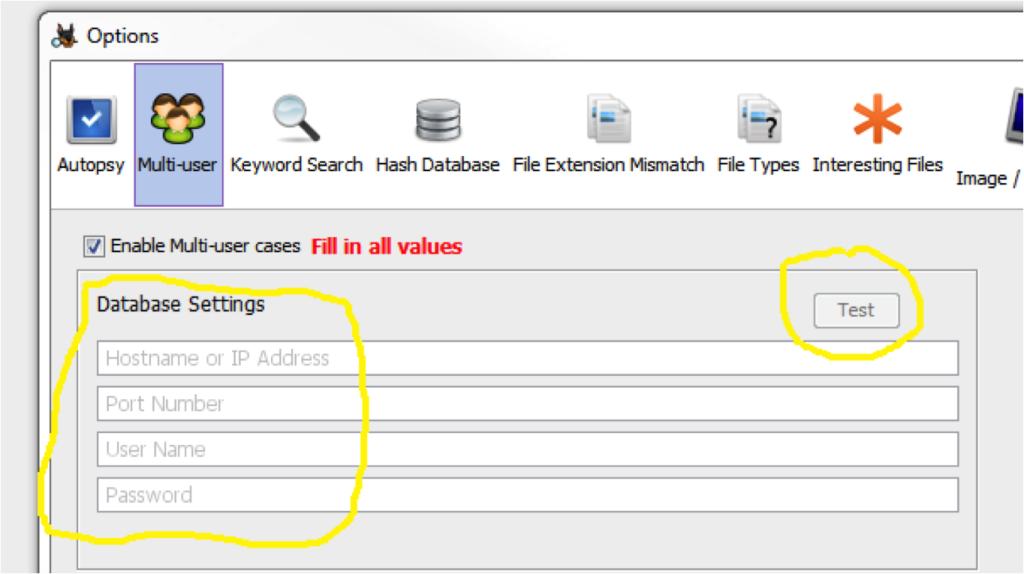
To use multi-user cases, you download the same Autopsy installer that you would for a single-user case. To enable the multi-user features, you’ll need to select the Multi-User tab under the “Tools & Options” menu.
Step 1: Add a case database server
Autopsy uses a PostgreSQL server to store your case databases. This open source platform offers an enterprise-grade database for free. While an individual multi-user case database in Autopsy is small — its schema is identical to that of single-user (SQLite) in substance, it stores file metadata gleaned by The Sleuth Kit, and it stores artifact metadata produced by ingest modules — one database per case still scales well.
Add the hostname, port number, username and password of your data server and press the Test button to ensure that it can communicate with it.
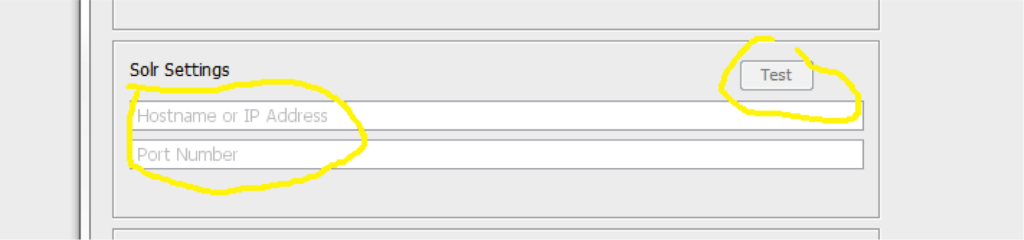
Step 2: Add a centralized Solr instance
Also open source and free, Solr is an enterprise search platform built on Apache Lucene™. For a multi-user case, Autopsy will use the central Solr server instead of the one that runs within Autopsy. Like a single-user case instance, the central server has one “core” (index) per case and is stored in the case folder, allowing you to quickly search on keywords and tags.
Add the hostname and port number of your Solr server and press the Test button to ensure that it can communicate with it.
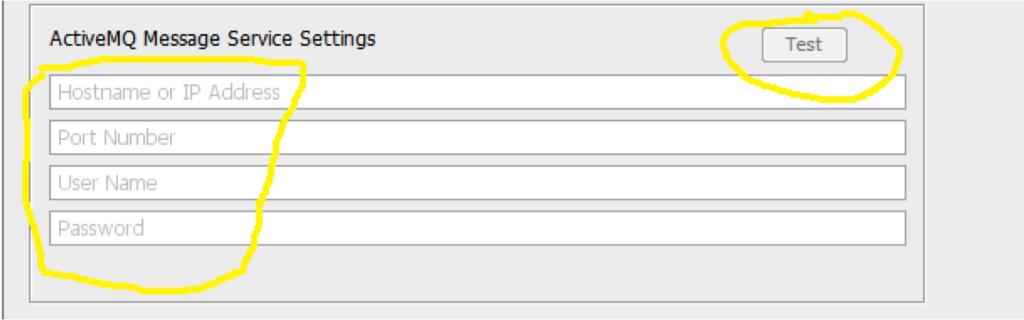
Step 3: Add a messaging system
Collaboration would be nothing without a way to interact with other investigators, particularly if teams are working remotely from one another. (Autopsy 4 can work over a VPN.) As you add images, files, and artifacts to your case, the Autopsy tree updates, and all collaborators can see progress via ingest progress bars which are implemented using the free and open source Apache ActiveMQ.
Enter the hostname, port, username, and password in the Options panel and press Test to ensure that they can communicate.
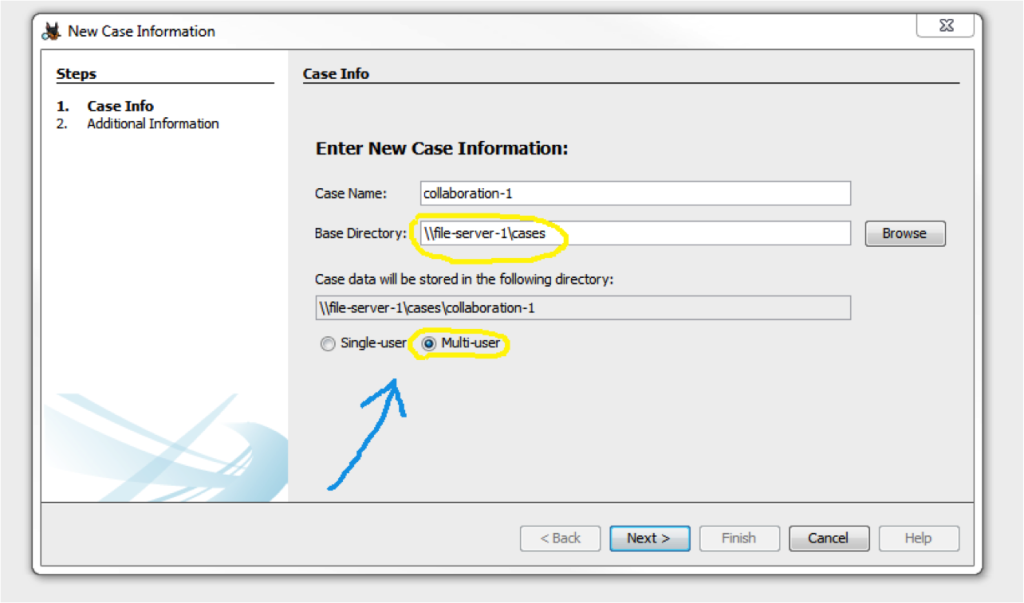
Making a Multi-User Case
After you’ve configured the central services, you can make your first multi-user case. Create a New Case in Autopsy and you will now have the option to choose a “Multi-user” case. Ensure that you use a Base Directory that is on the central storage so that other Autopsy clients can also read the case folder.
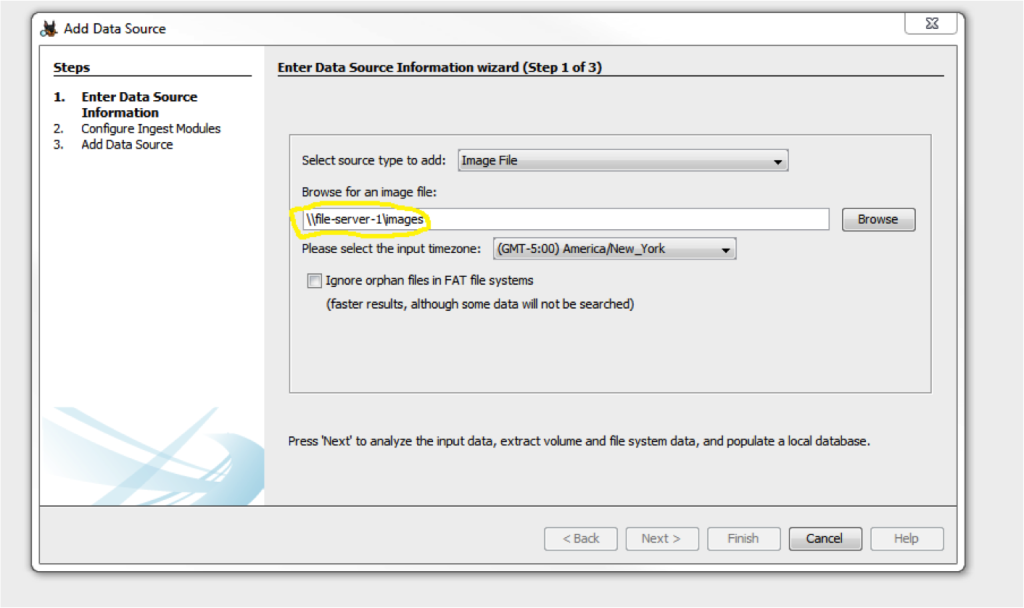
Next, add a data source to the case. Ensure that the disk image is on the central store so that other clients can read it.
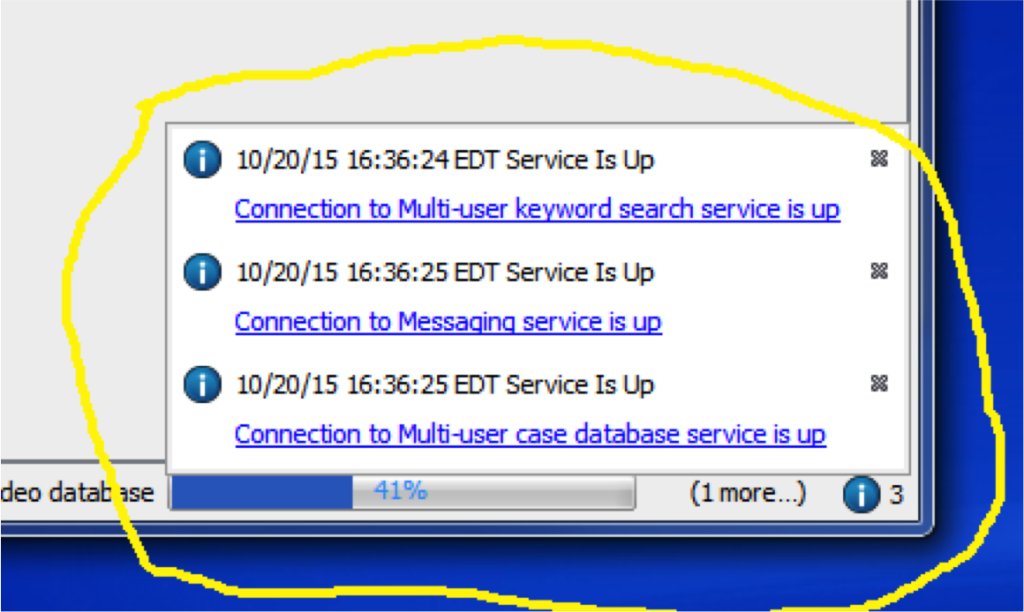
Service Monitoring
Investigators also need a way to monitor case services to ensure the collaboration is functioning properly. Autopsy 4.0 checks services when a multi-user case is first opened, and every few minutes thereafter, generating Up or Down messages as appropriate.
Autopsy will also check the status of the services when you configure it to run Ingest Modules (such as hash lookup or registry analysis) on the data source to ensure that the modules can access the database and keyword index.
Setting up Collaborative Autopsy
In sum:
- Step 1: Download and install Autopsy 4.0.
- Step 2: Decide where to centralize your case folders and images.
- Step 3: Install and configure PostgreSQL, Solr, and ActiveMQ. We recommend (but do not require) giving Solr its own machine with plenty of RAM, if possible; additionally, you can find some limited configuration details in the Autopsy 4.0 documentation.
- Step 4: Point Autopsy 4.0 instances at the above services. Be sure to use the test buttons in settings to ensure everything is doing what it should.
- Step 5: Collaborate! Create a multi-user case and add a data source or image; then, configure and run ingest modules. After other examiners join in, you can then analyze and report.
As always, Autopsy 4.0 is extensible through custom modules that you can build yourself using Python scripting, or have Basis Technology design and build for you.