Triage Media With Autopsy 4.4.0
With the new Autopsy 4.4.0 release, we introduced some new triage features that help you more quickly answer some questions about a hard drive or smart phone. The goal of this blog is to give you an overview of the features. I’m going to cover when and how to use these features.
When To Triage
The triage features are designed for situations when time is of the essence and you don’t have time to do a full image of a drive and then analyze every file. The idea is to make your limited time as productive as possible.
The new Autopsy features allow you to:
- Skip the acquisition / imaging step
- Analyze only a subset of the files
Scenarios where this could be important include:
- When you need to decide which computers to bring back and which to leave behind.
- At a border crossing or similar situation where you have limited time to make a decision about seizing a device.
- During a home probation visit or “knock and talk” when looking for possible evidence.
- After a major incident and quick actionable intelligence is needed.
There are typically a few ways to triage media:
- Remove the media and attached it via USB to your analysis system. This is what we’ll talk about in this post.
- Insert a USB device onto the running target computer and run a program. You can do this with Autopsy, but it will leave folders and files behind in the AppData folder.
- Boot the computer from a USB drive. You can do this with Autopsy with WinFE.
Let’s now go through the new features.
Image While Analyzing
Making a forensic image of a drive is time intensive and you can now skip the step with Autopsy. There is a new feature that allows you to make a sparse VHD image of a USB-connected device. VHD files are used by virtual machines and allow you to quickly save disk sectors in random orders.
Here’s how it works:
- The user adds the USB-connected device as a Data Source and Autopsy / The Sleuth Kit reads data from the disk to determine its volume and file system.
- As sectors are read from the USB device, Autopsy looks up the address in a list to see if it has already seen that sector before. If it hasn’t, it makes a copy of it in the VHD file.
- The user then configures the ingest modules to run and now more MFT entries and file content are being read from the USB device so that hash calculations and keyword searches can be performed. As that data is read, copies of the sectors are being made to the VHD file.
- By the end of the analysis, you’ll have a copy of every sector and therefore a complete image. Autopsy will then update its internal database to refer to the VHD file instead of the USB device (so that you can unplug it and take it away).
- If you don’t have time to do a full analysis and you pull the drive early, you’ll have a partial image that can still be mounted in Windows and analyzed by standard tools. And because Autopsy prioritizes user folders to be analyzed first, your partial image is more likely to have user content instead of OS or application files.
Our testing has shown that there is virtually no performance impact of this feature.
To use this feature:
- Choose “Local Drive” as a data source and then choose the drive that was attached (you will need to run as Administrator to see all drives).
- Then check “Make a VHD image of the drive while it is being analyzed”
- It will create a path for the VHD file in the case folder. You can change this if you want. It is going to create one large VHD file.
- Select “Update case to use VHD file upon completion” if you want Autopsy to update the case database to use the VHD file instead of the USB drive letter when the VHD is complete.
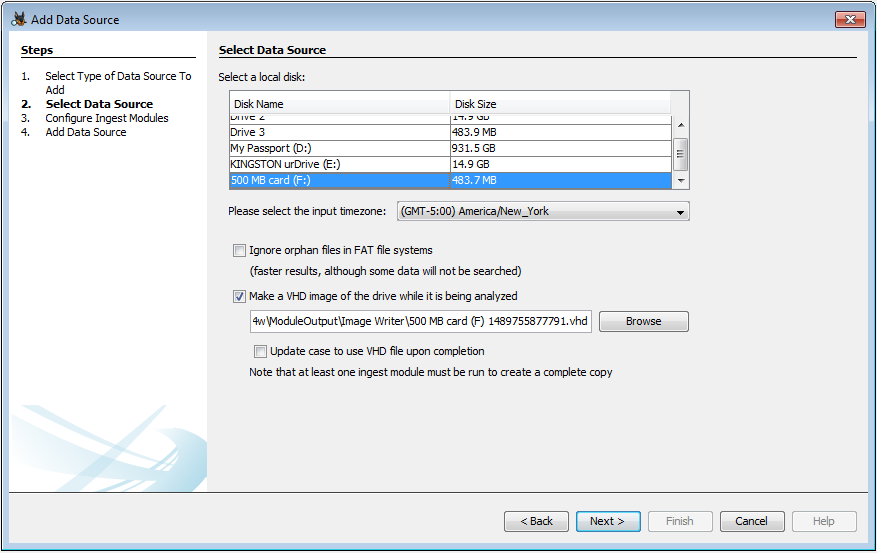
NOTE: The VHD format does not have any form of cryptographic integrity checks. So, if you need to maintain evidence, you should calculate the hash value of this file and keep that in a safe place.
Ingest Filters
The previous feature just saved us the time of making an image before we started analysis. But, sometimes you need to make sure you get to the relevant files (such as all pictures) in a short amount of time. The new Ingest Filters feature allows you to analyze only a subset of files.
By default, Autopsy will send all files down the ingest pipelines, which perform the hash calculation, EXIF extraction, keyword extraction, etc. Ingest Filters allow you to send only a subset of files down the pipeline. You can make rules based on folder path and extension.
For example, if you want to search for child exploitation images, you can make an ingest filter to send only “.jpg”, “.jpeg”, and “.png” files down the pipeline so that they can be hashed and looked up in databases. Or, you could make a filter to only analyze documents on the “Desktop” or “My Documents” folder so that they can be keyword searched.
To use this feature:
- Make a new filter by going to Tools -> Options -> Ingest. Choose the File Filters tab.

- Press “New Filter” and give it a name and optional description.
- Press “New Rule” to specify which extensions and folders should be allowed in. You can choose to allow in Unallocated space or not.
- Add as many rules as you need to. They are added as “OR” so that it can be, for example, “.docx” or “.pdf” or “.xlsx” files if you had three extension-based rules.
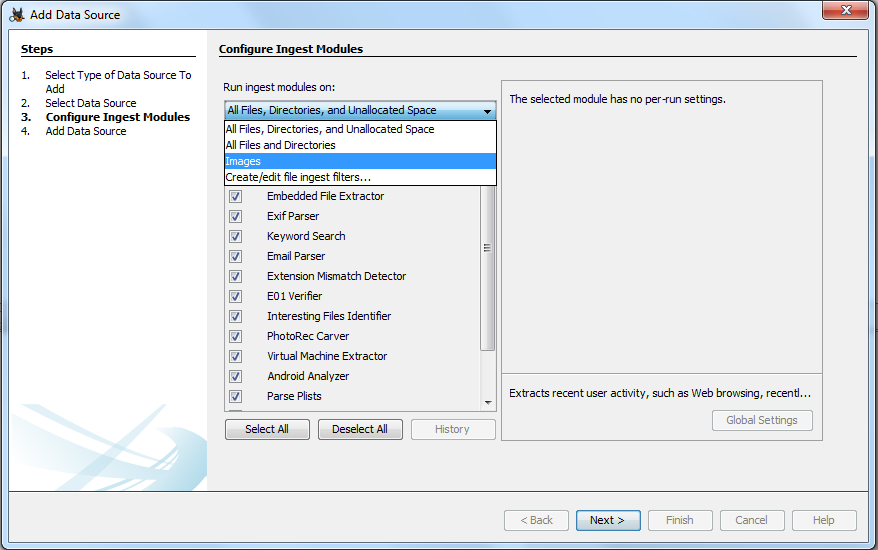
You can use the filter when you configure the ingest modules to run. After you add a data source to the case, you’ll be prompted to choose which ingest modules should be in the pipeline. You can apply a filter to analyze only a subset of files using the pull down menu above the list of ingest modules.
Ingest Profiles
So, we’ve now saved you time by not imaging the system and we are analyzing only a subset of files. Our final time saving step is to start the analysis process faster by reducing the user interactions needed with ingest profiles.
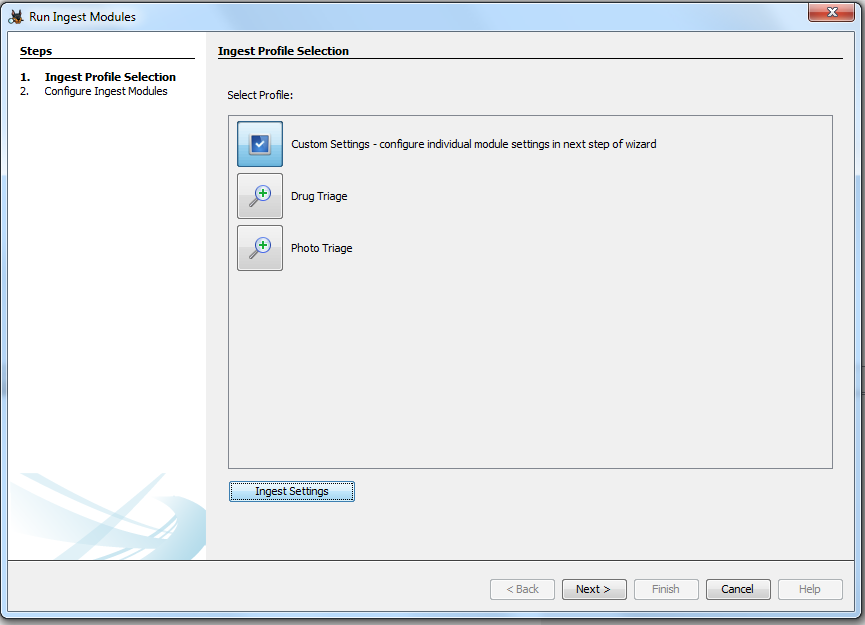
An ingest profile is a new feature that allows the user to pick an ingest filter and a set of ingest modules to run with a single button click. You can create different profiles for the different scenarios that you need to triage.
An example system could have two profiles:
- Photo Triage: Has an ingest file filter to only process pictures and has only the hash calculation and lookup ingest module enabled.
- Drug Triage: Has an ingest file filter to process only documents and emails and has the keyword search ingest module enabled to look for drug terms.
With profiles defined, the user simply needs to press the button for the profile when they add a data source and it will then run with no further steps.
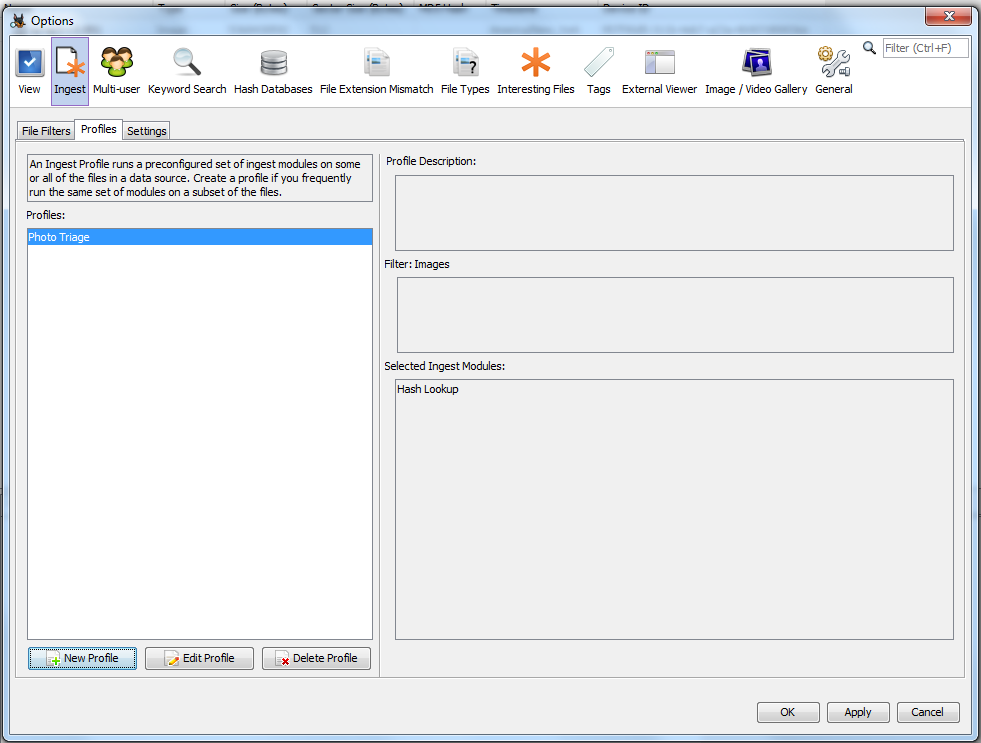
To make a profile:
- Go to the Tools -> Options menu and choose “Ingest” and and then “Profiles”.
- Press “New Profile” and give it a name an optional description.
- Select the File Filter that you want to use (or make one if it doesn’t already exist).
- Select and configure the ingest modules that you want to apply.
Conclusion
The Autopsy 4.4.0 release added features to make the most out of your time when you choose to not do a full analysis. If you have any further questions about these features, send an email to the sleuthkit-users email list or submit an issue on github.
If you haven’t tried it yet, download Autopsy from here.